
It's time for another Thrifty 3D Wednesday tutorial! These Sliders are lots of fun and pack a Candy Bar surprise! After you do the first one, they are very quick and easy to make! I've made a short tutorial to help you make one for yourself!

 Step 1:
Cut outside cardstock to 6 x 9 1/4 and score at 1/2, 3 1/2, and 6 1/2. Wheel Whimsy Jumbo Wheel over entire piece with Real Red Ink Cartridge.


Step 3:
 Step 4:
 Measurements:
Outside
Poppy Parade: 6 x 9 1/4
score: 1/2, 3 1/2, 6 1/2
Peach Parfait: 2 1/2 x 5 1/2
Whisper White: 2 1/4 x 5 1/4
Clipboard:
Whisper White: 1 3/4 x 2 1/4
Poppy Parade: 1 7/8 x 2 3/8
Crumb Cake: 2 x 2 7/8
Front:
Designer Paper: 2 1/4 x 4 3/4
Peach Parfait: 2 1/2 X 5
Stamps: Eat Chocolate, Whimsy Wheel
Cardstock: Poppy Parade, Crumb Cake, Whisper White, Peach Parfait, Sunny Garden DSP
Inks: Early Espresso, Poppy Parade, Real Red Ink Cartridge
Marker: Daffodil Delight
Accessories: Corner Rounder, Poppy Parade Ribbon, Small Library Clip, 1" Circle Punch, Stampin' Dimensionals, Sticky Strip
Inside:
Pull up candy bar for a slider surprise!
 Step 1:
Cut outside cardstock to 6 x 9 1/4 and score at 1/2, 3 1/2, and 6 1/2. Wheel Whimsy Jumbo Wheel over entire piece with Real Red Ink Cartridge.

Step 2:
Cut a strip of plastic (I used a grocery bag) approximately 1 1/2 x 14". Wrap around first panel and secure with Sticky Strip to itself. Do NOT stick to cardstock, make sure the loop of plastic moves freely.
Punch 1" half circle in second panel from left at top.

Step 3:
Decorate Whisper White panel with Chocolate image, adhere to Peach Parfait layer. Apply two Sticky Strips to top center front of design, approximately 2".
Apply two Sticky Strips to back and center bottom of Hershey bar, approximately 2".
 Step 4:
Remove Sticky Strip liner from Hershey Bar and adhere to first inside panel (undecorated side) ONLY on plastic bag loop. Make sure it moves freely.
 Step 5:

 Step 5:
Remove Sticky Strip from front top portion of Chocolate image cardstock piece. Adhere face down to other side of first panel ONLY on plastic bag loop.
 Step 6:
 Step 7:


That's it! I hope you enjoy this edition of Thrifty 3D Wednesday!
 Step 6:
Apply Sticky Strip to 1/2" end piece along entire length.
 Step 7:
Fold end piece inside and secure to front Poppy Parade panel. (Do not adhere to Peach Parfait panel).
Test slider by pulling Hershey Bar from top.
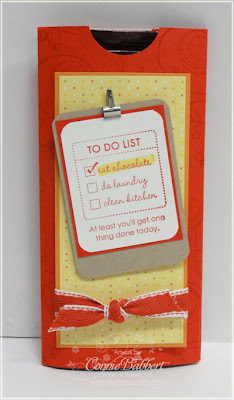
Finish decorating the front of Slider.
Adhere Designer Paper to Peach Parfait cardstock. Wrap Poppy Parade Ribbon around front and tie a knot.
Round corners of Crumb Cake. Stamp Chocolate Checklist image in Poppy Parade on Whisper White, round corners. Highlight the word Chocolate with Daffodil Delight Stampin' Write Marker.
Adhere to Poppy Parade cardstock, then Crumb Cake. Add small library clip to top. Pop up on front with Stampin' Dimensionals!
Stamp chocolate bon bon image with Early Espresso on scrap Whisper White and cut out. Place next to chocolate sign inside slider.
That's it! I hope you enjoy this edition of Thrifty 3D Wednesday!


I will buy a small block of chocolate tomorrow, and have a play with this...
ReplyDeleteOh my goodness-- the mini clip board is amazing..I have just added those clips to my order-- soooooooooooo adorable!
ReplyDeleteThanks for the tutorial, Connie! This is so cute! It will make a cute gift for my coworkers!
ReplyDeleteSue
www.soggystamper.com
What a great reason to buy a whole case of chocolate bars! Practice! I have a Downline meeting next week and I wanted to have something like this ready for them.
ReplyDeleteLove this idea. I did something similar, but this is WAY cuter. I'm CASEing soon! I sure hope this set makes it to the new IBC - it's so much fun to do and share!
ReplyDeleteThanks, Connie! It's a great idea,
ReplyDeleteThank you! This is such a CUTE idea!
ReplyDeleteI wonder if your readers would benefit from a good resource for candy fundraising ideas? There are tons of different candy fundraisers to consider. But not all candy fundraising programs are the same.
ReplyDelete