Good Afternoon! When I saw this post on our operator Gretchen's blog, I knew that we should post it to the 411 blog as a permanent staple to add to our "how to" library of posts.
Thanks so much for sharing your talents with us Gretchen!
Gretchen wrote: "I finally finished today what I started quite some time ago, figuring out the dimensions to use when you want a square or rectangle cut with the new Stampin' Up! Scallop Trim Border Punch and Stampin' Up! Scallop Trim Corner Punch. These punches have a larger cutting surface and a sleek new body which makes them easier than ever to punch. You can use them on the table or hold them upside down so you can see what you are punching. And, they lock closed which means you can store them upright in a very small space.
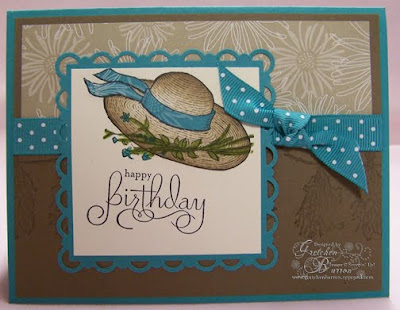
 Because of the way the punch is designed and the spacing of the scallops, it is possible to cut quite a variety of squares and rectangles and get the scallops to line-up and be even. As you can see in the photo above, I cut 7 different sized squares. You could even go larger than these, for a scrapbook or other project, but for card-making purposes, I thought these would serve us well. The very smallest square that you see on the top of the pile in the photo above, began with a square of Whisper White cardstock that was 1 15/16" square. That's just a pinch, maybe only half-a-pinch, smaller than 2". For this smallest square, you only need the corner punch. Holding your corner punch upside down so you can see what you're doing from the bottom, slip each corner of the square right to the corner of the cutting edge (the "v" shape). After you've done the first corner, just make sure that each corner lines up with the previously punched ones. It's a little difficult to show in the photo but once you do it, you'll understand what I mean. By working from the bottom of the punch, you will be able to see where each scallop lines up with the ones previously punched. There is a
  bit of a learning curve for working with these punches, but I'm confident that once you get them out and practice a few times, you will get the technique down. When you cut this smallest square, you will be able to layer on pieces that are punched with the 1 3/8" and 1 1/4" square punches, as I did in the example on the right (click on the photo to enlarge it). Don't you just love it when everything fits together so easily!
 For all the rest of the scallop squares and rectangles that I'm going to show you today, you will need to use both the Border and the Corner Punches. You can see in this photo the size square to begin with.
- 4 3/4" makes a square that has 10 scallops along each side
- 4 1/4" makes a square that has 9 scallops on each side
- 3 13/16" (just a hair bigger than 3 3/4") makes a square that has 8 scallops along each side. This is the size that fits perfectly into the guide that is printed on the Scallop Trim Border Punch and therefore makes this a great size to practice on. Once you get this size down, it will be easier to branch-off and make your squares smaller or larger.
- 3 1/4" makes a square than has 7 scallops along each side.
- 2 7/8" makes a square that has 6 scallops on each side
- 2 3/8" makes a square that has 5 scallops on each side
- And then, the original smallest square that I described above begins with a square that is 1 15/16" and uses only the corner punch.

 Let's begin with the 3 13/16" square with 8 scallops on each side since this is the one that will fit perfectly into the guide that is printed on the Scallop Trim Border Punch, making it easier for you to see and line-up your scallops perfectly every time! First, you will want to punch all 4 corners, as described above, holding the Corner Punch upside down so that you can see what you are doing. Make sure and stop your cardstock right at the edge of the cutting blade so that your finished piece will end up square and not lop-sided. Once each of the four corners have been punched, line up two of the scallop corners over the printed guide on the Scallop Trim Border punch, and simply press down, using the ball of your hand -- easy, schmeesy! Repeat this step for each of the four sides and ... voila! You have a perfect Scallop Trim Border Square. Practice a few times with this size and then you'll be ready to begin making all different sizes.
 Okay, now that you've got the punching mechanics and technique down, you can begin to make larger and smaller squares. Simply use the dimensions that I've given you above, punch each of the four corners as described above and then, line up just one corner (as opposed to the two corners that you did for the 3 13/16" square above), punch first one side and then slide your cardstock over and line up the opposite corner and punch the other side. As long as you line up your corners, you should come out fine each time.
 For squares that are smaller than 3 13/16", you will probably find it easier to turn the border punch upside down so that you can see to line-up your scallops. Once the scallops are in-line with the blades, simply punch! Once again, it takes a little practice but it will be worth it as you create beautiful projects using these new and exciting punches!
 Now, squares are great, but sometimes you want a rectangle. No problem, simply use the same dimensions as above for two sides and use another dimension for the other two sides. In my examples here, I've begun with rectangles that were 3 13/16" x 4 3/4"; 3 1/4" x 5 3/4"; and 2 7/8" x 1 15/16". Any combination will work, as long as you stick with the measurements that I gave you above.
Okay, this is turning into quite a lengthy post but I do have time for a quick card. And I do mean quick -- once you're practiced these techniques, you will be amazed at how quickly you can punch out squares and rectangles!
 For this card, I punched a Rich Razzleberry Rectangle that began as 3 1/4" x 4 3/4" and a Melon Mambo that began as 2 7/8" x 4 1/4". I attached them together using SNAIL adhesive. The Whisper White mat was cut at 2 1/4" x 3 5/8" and quickly stamped with the valentine stamp from the Wandering Words stamp set (from the Holiday Mini Catalog) and Rich Razzleberry ink. I centered this on layers of Melon Mambo Print and Rich Razzleberry and attached a quick bow with Crystal Effects. That was it -- this entire card probably took me less than 5 minutes to make, start-to-finish!
So there you go! Experiment ... practice ... have fun ... and create!"
 Good Evening Stampers!
 Patti Chesky
 Gretchen Barron
 Connie Babbert
 Tiffany Bauer
 Selene Kempton
 Lee Conrey


