Friday, September 30, 2011

Saturday Sketch Challenge 223

Good Evening Friends!

It's Friday night and ya know that means another inspiration sketch challenge from the operators at here stamping 411.

I'm digging this clean and simple sketch this week and by the looks of the inspiration cards below, the operators had fun with this sketch.

Here are some potential measurements for this sketch.

Base 11 x 4 1/4", scored and folded in half at 5 1/2"
Layer 2: 5 x 3 3/4"
Layer 3: 4 7/8" x 3 5/8"
For layer 4, how about a ribbon or a piece of cardstock cut to 4 1/4" long.
For the focal point you can use any shape that fits your stamps. Try cutting your cardstock the same size as your wood or clear mount block.
and have fun!!!

Here are your operator cards for this week:

Are you ready to play along? We sure hope so! Never played with us before?? Well, it's easy! Sky's the limit!
  1. Make a card using your Stampin' Up Supplies!
  2. Post it online somewhere to your blog or other online forum
  3. Post a link to the free linky tool below (please point the link to your post and NOT just your blog).
  4. Have some fun and leave comments for each other (and for the operators if you like their work). ~ Everyone loves comments!
  5. Please note, we reserve the right to remove links with non-Stampin' Up! product, "sales pitches", links to online stores, or requests to join your team. We're here to have fun, learn from one another and share.
We hope you join us this week and play along with this sketch! But don't delay our links will close at 8AM on Thursday morning Eastern Standard Time.

Rubbah hugs,
Selene Kempton


Stampers Showcase #222


WOW!!! Such fun, beautiful and creative cards this week! Great job, one and all! Thanks so much for playing along with the Stamping 411 Operators! Here are your Operator Picks for this Sketch Challenge #222. Keep up the fabulous work and keep that creativity flowing!

Thursday, September 29, 2011

Featured Artist for October

There are so many amazing artists that play along with the operators on Stamping 411 on a weekly basis. We really love to take the time to highlight our friends from time to time. With that in mind for the month of October, we asked our friend Carrie Gaskin aka Artistic Avenger be our featured stamper for the month of October.

I asked Carrie to write a little bit about herself and this is what she wrote:

Hello there all, my name is Carrie Gaskin. I am lucky enough to live in on the amazingly beautiful coast of British Columbia, Canada and living here you can't help but be creatively inspired. I have been a SU Demonstrator now for almost six years and have loved every minute of both the creative and business aspects. I love making cards most of all as I am an "instant gratification" type of gal. Scrapbooking still intimidates me some but I'm trying, really! 3D projects are also something I love to do and share. I'm always making something for someone! Sharing in my love of papercrafting are my two kids (daughter aged 10 and son aged 8) - that is probably one of things that makes me feel the luckiest, I get to share my love of stamping with them and they feel such a part of what I do. Also thrown into my mix is my dear husband, Craig. Although certainly not a crafter (sorry hon) he is an extremely supportive partner who continues to help me look at things in different ways to expand my personal creativity.

Carrie will be joining us for the whole month of October. She will be playing right along side of all our operators with each weeks sketch. Make sure you stop over at her blog: Artistic Avenger, to check out all her awesome work and leave her some lovin'!! I asked Carrie to share with all of us one of her favorite techniques and she wrote us this awesome tutorial on Bleaching.

Bleaching Tutorial
By Carrie Gaskin
clip_image002
  1. Start out with a piece of cardstock on which you’d like to showcase your bleached image. I used Crumb Cake in my sample. I have found it best to emboss your image first. I used Versamark and Black embossing powder.
clip_image004
  1. Emboss your image.
clip_image006
  1. Take a small paintbrush you can also use a Blender pen (although then this is all you can use it for) and gently add bleach to where you’d like on your embossed image.
clip_image008
  1. You can either let it sit to dry or you can heat it with your heat tool. TIP: if you don’t want the bleach to move around, heat the paper from the underside.
clip_image010
  1. Once dry, you can colour in using ink and blender pens. Take note: some of the colour may still bleach out once you colour it so use rich colours. And voila!
clip_image012

Thanks Carrie for this easy but awesome tutorial. I think I can now try my hand at some bleaching. Stay tuned in October to see lots of great new sketches and Carrie's take on our sketches, you will not be disappointed!!

Have a great day,
Tiffany

Friday, September 23, 2011

Saturday Sketch Challenge 222

Good Evening Friends,

This week we have another wonderful sketch, but before we get to that I need to address a small matter that has been brought to our attention.

We strive to provide information for EVERY new stamper and LOVE when you play along with our challenges. Because we are all friends here, we also agree not to market to one another. We all feel very comfortable sending our customers here because we know that we're only here to play! This week, we had to remove several links containing "buy from me," links for personal gain and sales pitches in your posts.

We also received emails from some of you asking why it's okay for some and not for others. So, the answer for that is that we just hadn't gotten to them yet but will continue to remove those. :D Although you are free to post whatever you want on your blog, we, with great respect would like to request that we keep posts for 411 just for fun. We want to provide information for you, and if you are a demonstrator, for your customers without marketing to them. We'll leave that part up to you in your local workshops, classes and clubs.

Unfortunately, one of the entries chosen for the "stampers showcase" this week was also removed for the same reason. Thanks for understanding and now, let's get crafty!

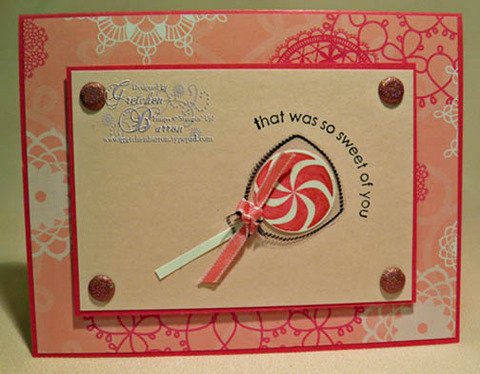
When I look at a square card, somehow I always think of fellow operator and friend Patti Chesky. Patti has a way with square cards, and I was most impressed with the first one I got from her which didnt fit a large square envelope (which would make a 5 1/4" card square). Instead, her card was 4 1/4" square and it fit a standard sized medium envelope. Although there is room to spare, you don't have to pay the extra postage that a square card requires.

Many of the operators post all the measurements for their specific creations on their blogs, so tonight, I'm going to give you the measurements for a small square card. For specific measurements for the operators, just click on their name (located below their creation) and you'll hopefully have what you need!

Potential measurements:

Base 4 1/4" x 8 1/2", scored and folded in half at 4 1/4"
Layer 2: a 3" circle (maybe cut by big shot?
A ribbon in between and you're good to go. Now if you wanted to, you could attach the ribbon underneath the circle element, and have the ribbon show up inside the card (with no adhesive), then attach a separate bow, or you could just tie a ribbon on! Either way would work for sure!

Next ~ here are the inspiration cards from your operators this week!


Are you ready to play along? We sure hope so! Never played with us before?? Well, it's easy! Sky's the limit!
  1. Make a card using your Stampin' Up Supplies!
  2. Post it online somewhere to your blog or other online forum
  3. Post a link to the free linky tool below (please point the link to your post and NOT just your blog).
  4. Have some fun and leave comments for each other (and for the operators if you like their work). ~ Everyone loves comments!
  5. Please note, we reserve the right to remove links with non-Stampin' Up! product, "sales pitches", links to online stores, or requests to join your team. We're here to have fun, learn from one another and share.
We hope you join us this week and play along with this sketch! But don't delay our links will close at 8AM on Thursday morning Eastern Standard Time.

Rubbah hugs,
Selene Kempton


Stamper's Showcase #221


All of the Stamping 411 Operators continue to be amazed at the entries we are getting each week. You are all exercising your creative muscles and getting better and better each week. We so enjoy seeing your creations! It was a tough choice, but here are your Operator Picks for Sketch Challenge #221. Keep them coming!

Thursday, September 22, 2011

Blast From the Past #1

I will be doing a brand new article here on the Stamping 411 Blog on the third Thursday of all odd numbered months. This article will be a blast from the past which means I will be taking an older sketch of ours and showing you how to turn the card sketch into a scrapbook layout.


This is the first sketch I have chosen from December 11th, 2009, SSC #129. Seems like so long ago!! Well I guess it is, over 2 years ago. Make sure to check out the original post to see all the projects that the Operators made using this sketch but right now check out how I turned this card sketch into a scrapbook layout.


So what do you think? Like how it turned out?? I LOVE how it turned out!!! I used the Big Top Birthday DSP, Real Red, Tempting Turquoise, Daffodil Delight & Whisper White Card Stock, Whisper White Bakers, Real Red & Daffodil Delight Brads, Petite Pennants Builder, 1/2" Circle & 3/4" Circle Punches and Sweet Shoppe Alphabet Lower Stamp Set.


I just love doing banners!!! They are so much fun and easy to make!!


I hope you enjoyed my first installment of "Blast From the Past" article!! Watch for this new article in the months of January, March, May, July, September and November.

Have a great day!!
Tiffany

Wednesday, September 21, 2011

How to Wednesday. Checkered Patterened Background

Hi Everyone,
I've got a fun little technique for you today. I call it the Checkered Background Technique. I hope you like it! Here is the card I made using this technique.
Kids visit and checkered background 109
I love Cherry Cobbler and Always Artichoke on Very Vanilla….kind of gives this card a Nostalgic look…don’t you think?
Want to learn how to do this background?

It's a Technique that you can do with the Stripes Embossing Folder. I hope you will give it a try…it’s easy…it's fun….and it's oh so cute!!!

First you need to take a piece of Card stock cut to 4 1/4 x 5 1/2
Kids visit and checkered background 088
Next collect two of your colored pads that you will use, a brayer, the Stripped Embossing Folder and your Big Shot.
Kids visit and checkered background 089
Load your Brayer with one of the colors of ink and brayer onto the inside top portion (lettering on top) of your Embossing Folder. Then lay your cut piece of card stock in and crank it through your Big Shot. This is what you will end up with.
Kids visit and checkered background 094Kids visit and checkered background 095
Next rinse your Embossing Folder and your Brayer under water to clean and get ready for your next color. Make sure to dry it well with Paper Towels.
Kids visit and checkered background 096Kids visit and checkered background 100
Brayer on the Second Color
Kids visit and checkered background 090 Kids visit and checkered background 091
Lay your stripped piece across the stripes this time and run through the Big Shot again……see what you get???
Kids visit and checkered background 103 Kids visit and checkered background 105
Here are the elements I’ve used for my card…..
Greeting Card Kids Stamp Set. Cherry Cobbler Seam Binding. Cherry Cobbler Card Stock cut to 4 1/4 x 5 1/2 and then I trimmed the piece of checkered to 3 7/8 x 4 1/4. I used the Lace Ribbon Border Punch to add a little border at the bottom just to introduce a bit of Always Artichoke into the mix.

I then stamped the image with Stazon and colored with my Aqua Painter and Earth Elements Watercolor Crayons, using Always Artichoke and Cherry Cobbler, what else.
Kids visit and checkered background 106 Kids visit and checkered background 107
I then tucked the Triple Bow behind the checkered piece and secured with adhesive. and attached all to the front of the card base. I did pop up the oval image piece with Dimensionals.

I had a little piece of the checkered left over so included it at the bottom inside to finish it off.
Kids visit and checkered background 109
Oh and I didn’t use the button….just didn’t think it needed it. Hope you enjoyed this fun and easy tutorial and will give it a try.
Thanks for stopping in……
Lee

Friday, September 16, 2011

Saturday Sketch Challenge 221

Good Evening Friends!

All I can say is...
We have BIG News!!!

Tonight we are announcing that we are adding a brand new team member Tammy Fite to our team, and we are all so happy about it! Tammy has been playing with stamping 411 for such a long time and we here at 411 just love her work. We asked this past week, and she said yes!! :DSo, once Tammy Fite's link is live, please go say "hi" and give her a warm welcome to the team. We're sure happy to have her with us! Yeaaaaa!!!

On to this week's fabulous sketch! I just love clean and simple and this week's sketch certainly fits the bill! How about some possible measurements to get started.

Base: 11 x 4 1/4", scored and folded in half at 5 1/2:
Layer 2: 4 1/4: x 3 1/4" (if you cut this from a piece of 8 1/2 x 11, you should yeild six pieces with minimal waste)
Layer 3: 4 x 3 (you will net 12 pieces from a 12 x 12 with no waste.
Additional layers can be punches or cut shapes, feel free to use whatever is inspiring you... flip the sketch, get funky with it! :D Above all, please have fun!

Now... Introducing your stamping 411 operator picks, including our newest member Tammy!


Tammy Fite


Gretchen Barron


Tiffany Bauer


Selene Kempton


Lee Conrey


Patti Chesky

Are you ready to play along? We sure hope so! Never played with us before?? Well, it's easy! Sky's the limit!
  1. Make a card using your Stampin' Up Supplies!
  2. Post it online somewhere to your blog or other online forum
  3. Post a link to the free linky tool below (please point the link to your post and NOT just your blog).
  4. Have some fun and leave comments for each other (and for the operators if you like their work). ~ Everyone loves comments!
  5. Please note, we reserve the right to remove links with non-Stampin' Up! product, "sales pitches", links to online stores, or requests to join your team. We're here to have fun, learn from one another and share.
We hope you join us this week and play along with this sketch! But don't delay our links will close at 8AM on Thursday morning Eastern Standard Time.

Rubbah hugs,
Selene Kempton