
Hello stamping friends! It’s time for another “How to…..” installment here at the 411. This week we will deal with the problem of your stamped images coming out less than – shall we say – crisp? How about clean, or fully inked, or maybe even plain ol’ Yukk!
There is a stamping term for what needs to be done to get a lovely, clean image each time you stamp with it. It’s called Conditioning. Yes, I know thats normally what you do to your hair after you shampoo it, but trust me, this is much less messy and no hair is involved!
You may ask, “Why do I need to do anything to my stamps, after all, they are brand new.” Well, when your stamps come from the manufacturing facility, they have a slight haze or film on the surface of them. This is noticeable when you ink your stamp for the first time. When you’ve transferred the image to cardstock you get an image that looks something like the one on the left of this picture:
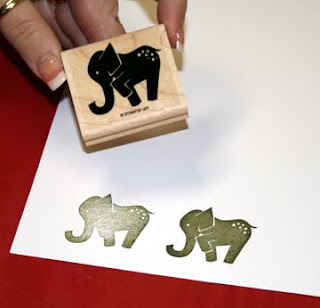
Yep! It’s especially noticeable with SOLID image stamps like this one where there are no lines to color in after stamping. But sometimes even your LINE ART images and GREETINGS need conditioning as well to make sure you are getting the best image transfer possible. We here at Stamping 411 know that you always want your images to look great from the first time you stamp them – us too! And the image on the right of the above picture shows you what a well conditioned, well inked stamp on cardstock looks like.
Now, there are several ways to Condition your stamps. The one I use almost exclusively is to lightly sand the stamp surface with my Sanding Block. I hold the stamp in one hand like this:
 Then, I rub my Sanding Block back and forth a few times in one direction:
 And then I turn the stamp a half turn and sand back and forth a few times in the opposite direction.
Once this is done, I spray some Stampin’ Mist on my Stampin’ Scrub and clean the stamp like this:
 making it ready to use. It’s really that easy folks!
Two other methods that stampers use are equally easy.
One is to use your Staz-On Cleaner and simply clean off the stamp, clearing away the residue. Here is an example:

You can also use a pencil eraser and rub it lightly across the stamp surface, like this example:
 Whatever method you choose is really up to your personal preference, but the main thing is to “Just Do It!”

You'll find that you'll "Enjoy Every Moment" of your stamping time when your stamps are well conditioned, well inked and well LOVED!
You can also use a pencil eraser and rub it lightly across the stamp surface, like this example:
Whatever method you choose is really up to your personal preference, but the main thing is to “Just Do It!” Be sure to clean your stamp before use with Stampin' Mist and the Stampin' Scrub when using either of these examples as well.
One other thing to consider when stamping with a conditioned SOLID image stamp is to make sure it has plenty of ink on it.
One other thing to consider when stamping with a conditioned SOLID image stamp is to make sure it has plenty of ink on it.
The way I do this is to use the “Twist and Tap” method. I first twist the stamp on the surface of the ink pad – dye or Classic inks only for this, Craft or pigment inks are different – about 3 to four times. Then I tap it a couple of times on the ink pad to evenly distribute the ink across the stamp surface. This results in a crisp, clean image almost every time.
I’ll leave you with an example of a cleanly stamped card I cased recently. The main image is a SOLID image stamp from the set “Enjoy Every Moment”.
I’ll leave you with an example of a cleanly stamped card I cased recently. The main image is a SOLID image stamp from the set “Enjoy Every Moment”.

You'll find that you'll "Enjoy Every Moment" of your stamping time when your stamps are well conditioned, well inked and well LOVED!
We're so glad you visit us here at Stamping 411! Come back soon and play along with our weekly Saturday Sketch Challenge - we'd love to see your creativity at work!
Stamped Blessings,
~~Robin


Thank you. This was explained very well. I can't wait to get new sets and condition them.
ReplyDeleteRobin is a rock star! This is so cool! What a fabulous tutorial!
ReplyDeleteRobin,
ReplyDeleteThanks so much for such a great article!
Wonderfully explained!
ReplyDeleteI've been a demonstrator for several years. I've heard people talk about rubbing their sander over stamps, but I never understood WHY they would do something that I considered "intrusive" to the stamp. THANKS so much for these wonderful instructions. Maybe now, my images will always be solid also. May I share this tutorial with my blog readers?
ReplyDeletethank you for the great stamp cleaning tip. I needed this and didn't know what to do.
ReplyDeleteLora
Wow! I had no idea! I'm a relatively new stamper. I'm sure you just saved me lots of time, money, and frustration! Thank you so much.
ReplyDeleteJust came across this. Never knew any of that. Thanks for the information!
ReplyDelete