Showing posts with label Takin' It To the Top. Show all posts

Thursday, June 23, 2011

Takin’ It To the Top with Pennant Parade!


Hello everyone and welcome to Takin’ It to the Top on Stamping 411, our monthly feature where we take one basic card and step-it-up two times to fabulous and beyond! We hope to show you what a difference it can make in your stamping projects when you add just a few extra elements – texture, color, layers, dimension, embellishments, etc.


Today’s cards feature the new stamp set, Pennant Parade, available from Stampin’ Up! beginning July 1st in the new 2011-2012 Idea Book and Catalog. It uses a bit of Cheerful Treat Designer Series Paper (a new Hostess option) and the colors of Concord Crush, Bashful Blue, Melon Mambo, Pretty in Pink, Daffodil Delight and Pear Pizzazz!


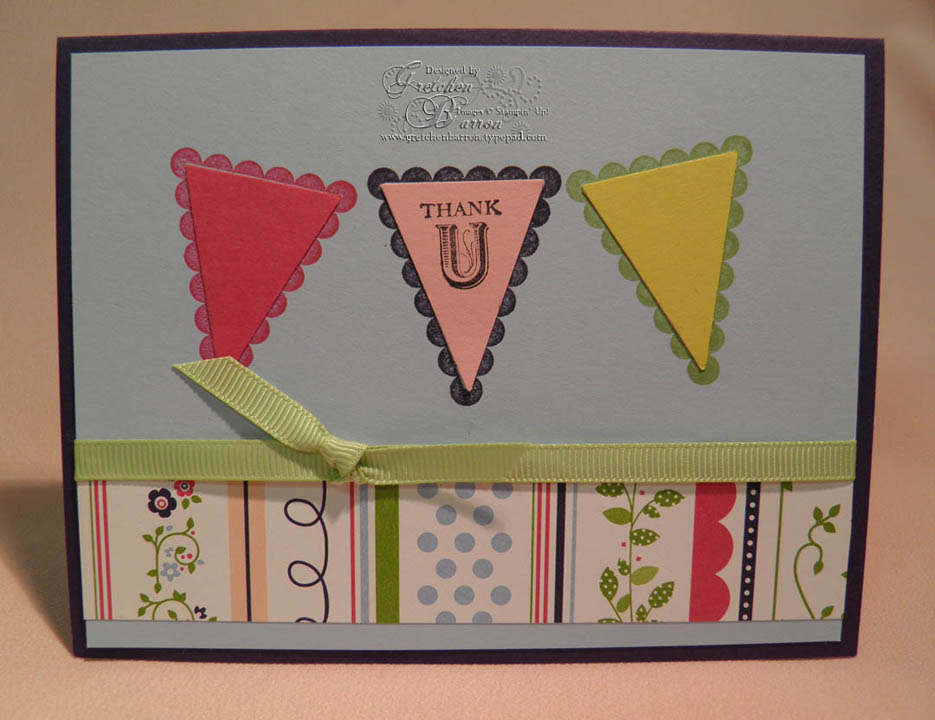
Above is our first card. It’s basic and simple, but it’s also fine as it is. The scalloped pennant images are stamped directly on the Bashful Blue cardstock and the inset triangles are punched with the new Petite Pennants Builder Punch (also in the new catalog). The ribbon is 1/4” Certainly Celery Grosgrain and the sentiment was stamped with Black Stazon Ink.


Okay, ready to step this basic card up just a bit? You can see that we’ve added some dimension by punching out both pieces of the pennant (scallop backing and triangle) and mounting them with Stampin’ Dimensionals. I used the Big Shot and the Perfect Polka Dots Impression Folder to give the Bashful Blue layer some texture. I changed out the ribbon to 1/2” Poly Twill in Concord Crush to add even more texture and contrast. And, I added an additional touch of whimsy and contrast by putting a Scallop Punch Border on the DSP layer in Melon Mambo.


And now, we’re ready to take this card to the top! Now remember, when you add elements it will take you longer to complete your cards and projects. But for a really special card for a really special person, isn’t it worth it?


And here’s the final card with even more texture, color, layers and dimension!


I inked the edges of the Bashful Blue layer with Concord Crush Ink. I switched the bow to the other side for more balance. I added some embossing to the triangle inserts in the pennants with the Big Shot and various Impression Folders. I stamped the scallop border on each of the scallop Pennant punched pieces and attached them so they look as if they are hanging on a line, using White Baker’s Twine, adding a tiny bow at each end. Finally, I added a couple of very tiny embellishments, a flower punched with the Itty Bitty Shapes Punch Pack and a butterfly cut with the Beautiful Wings Embosslet and the Big Shot. Each of those are further embellished with tiny Basic Pearls.


So, there you go – three different card using the same colors, stamp sets and basic design and stepping each one up just a bit to add interest and make it more special!


I’m so glad you came for a visit at Stamping 411 today! If you find yourself stepping up your cards and projects a bit this week, we would love to see what you do. Just leave us a link to your blog post below! We can’t wait to see how you take your projects TO THE TOP!


We hope you’ll visit again soon!


Thursday, May 26, 2011

Takin' It To the Top Thursday with Flower Fest!

Hello everyone and welcome to another Takin' It To the Top Thursday on Stamping 411! My goodness, how time flies. It seems like just a week or two ago that I last brought this monthly feature to you! But here it is ... time for another Takin' It To the Top. What we do with this feature is to demonstrate to you how easy it is to step up your cards and projects just a bit by adding a few extra, simple elements -- more layers, shading, texture, pattern, color, embellishments ... The goal is to not take it over the top, but to the top to make a card or project just a little more special!

All three cards today use the Flower Fest and Hodgepodge Happiness stamp sets; the colors of Wild Wasabi, Melon Mambo, Tangerine Tango and Whisper White. So here we go ...


This is our first card. It's simple but it's OK. It would be a great card for a beginning stamper, for a workshop or for those occasions when you need to make a bunch of cards quickly! I've used the Masking Technique to stamp the flowers and leaves and used the 1 1/4" and 1 3/8" Circle Punches for the sentiment. This card has minimal layers, colors and texture. Let's see what a difference it might make to step it up just a bit ...


Okay, this second card has a little more going on. We've added quite a bit more texture and pattern with the stamped background. We've added an additional color, Daffodil Delight, in one of the flower ink colors. Do you notice as well that I've added some extra layers here and have cut them with a smaller border (cut with an 1/8" difference rather than a 1/4" difference). I added an additional punch behind the sentiment as well, the Designer Label Punch.


Now, let's add a little more texture and some simple but interesting elements to take this card to the Top!


Look what I've done here! First of all, I've added even more layers and color with the addition of some Tangerine Tango cardstock. I embossed the stamped background with the Big Shot and the Square Lattice Impressions Folder, really giving it some great texture and interest. I extended the Wild Wasabi mat out a bit wider to allow me to add a Scallop Punch Border and a bit of 1/8" Taffeta ribbon and a bow in Daffodil Delight. Instead of masking the stamped flower and leaves, I embossed them, sponged on some additional color, cut them out and attached them to the card using Stampin' Dimensionals, giving more depth and texture. And finally, I added the Extra Large Oval Punch in Tangerine Tango behind the sentiment assembly.


It makes quite a difference, doesn't it, to just add a few simple and inexpensive changes!


I invite you, and challenge you, to try this with your cards and projects this week. Step them up just a bit by adding a few extras! And, we would love to see what you create! Leave us a link to your projects below and tell us how you took them to the Top! I can't wait to see what you create this week!


Thanks so much for stopping by stamping 411! On behalf of all the Operators, we hope you come back soon!


Thursday, April 28, 2011

Takin' It To the Top Thursday with Hello Blossoms!

Happy Thursday morning to you and welcome to another monthly edition of Takin' It To the Top Thursdays on Stamping 411! This is the monthly feature where I take one basic card and step-it-up two more times to show you just how easily you can dress up your cards and projects with a few simple additions. By adding extra layers, texture, and embellishments you can take your project from basic to beyond!

Today's cards all feature the darling new individual stamp from Stampin' Up! called Hello Blossoms. It will be available in the Summer Mini Catalog beginning on May 1st. I think this little stamp is destined to be a best seller ... it's happy and bright, fun and whimsical and perfect for a summer-time thinking of you note. Perfect as well for today's edition of Takin' It To the Top!

So, here's the first card for today. Basic with just a few layers and not a lot of embellishments. It's still a great card and perfect for beginning stampers or when you need to make quick multiples.


The card base is Daffodil Delight cut at 4.25 x 5.5", scored and folded. I added a layer of Melon Mambo Cardstock cut at 2.75 x 3.75" and then Whisper White cut at 2.5 x 3.5". I applied Stampin' Write Markers directly to the rubber using the colors of Old Olive, Pumpkin Pie, Perfect Plumb, Daffodil Delight, Marina Mist and Melon Mambo. Add a bit of 3/8" Taffeta Ribbon and a bow and the card is complete!


But look what a difference just a few simple changes makes! For this second card, I added an additional layer with a Certainly Celery Cardbase and the Daffodil Delight layer cut at 4 x 5.25". I also dressed it up a bit with the Big Shot and the Tulip Border Impressions Folder. The Melon Mambo and Whisper White layers and the stamping are all the same. But I added a small strip of Old Olive Cardstock punched with the Scallop Border Punch at the bottom before applying the ribbon and bow. See, just a few smiple changes but what a difference it makes for this card!


Now here's the final card. Again, just a couple of additons are all I did to change this one up and Take It To the Top! I added a double bow, instead of the tied-on faux bow in the previous two cards. And I gave some movement and dimension to the card with a whole flock (is that the right word for a group of butterflies? If you know, leave me a comment!) of tiny, colorful butterflies cut with the Beautiful Wings Embosslet and the Big Shot. That's it ... those are the only additions for this final card. But those two additons make this darling little card even more happy and bright than before. And what a thrill this card will bring to the one who receives it!


Well, that will about wrap it up for this edition of Takin' It To the Top!


I hope you've enjoyed seeing how you can take one basic card and step it up with just a few simple additons!


If you get ambitious this week and decide to take on of your creations to the top, stop back and leave us your link below. We would love to see how you Take it to the Top this Week!


Thanks so much for visiting today! All the Stamping 411 Operators hope you've been back soon!


Blessings, Gretchen


Thursday, March 31, 2011

Takin' It To the Top Thursday

Hello everyone and welcome to the March edition of Takin' It To the Top on Stamping 411! In this feature, we take a simple, basic (but still beautiful) card and we transform it to a special and spectacular card by adding layers, texture, color and embellishments.


It's our hope that this feature will help you look at your cards in a new way and discover how easy it is to dress them up ... either a little or a lot!


Today's Takin' It To the Top cards use the fabulous, new Paisley Petals Designer Series Paper that will be available to customers beginning tomorrow, April 1st! Contact your Stampin' Up! Demonstrator for more information!


Now, here is our first card -- it's simple, yes, but it's beautiful and it's a great choice when you need to make a quick card or need to make multiples in a hurry.


The Card Base is Not Quite Navy Cardstock -- begin with a 5.5 x 8.5" piece of cardstock, score and fold in the middle. Next is a layer of Designer Series Paper cut at 4 x 5.25". I've added a length of Baja Breeze 1/2" Seam Tape Ribbon across the bottom (roughly 1/3 of the way up from the bottom of the card). Fasten the ends of the ribbon to the back of the DSP and add a simple, faux bow (slip 6" of ribbon under the attached strip of ribbon, tie a simple overhand knot and pull tight and then trim the ends diagonally to the length that you desire). The sentiment, from the stamp set Word Play, is stamped on Whisper White Cardstock using Not Quite Navy Ink. The White layer is 2 x 2.75" and it's then attached to a Not Quite Navy layer that is 2.25 x 3". Attach to the card with SNAIL adhesive and the card is finished. This card is simple, easy, fast and a delight to anyone who might receive it in the mail. Another advantage for this simple, minimal layer cards ... no extra postage is required for mailing!


But we all have those occasions when we want to step our card up a bit -- to make it a little special for a special person or occasion! So, now let's take a look at Card #2. Using the same basic layout and materials, here's what I did to step this one up.


First of all, you can see that I added another layer and another color -- the DSP is cut at 3.75 x 5", Pear Pizzazz Cardstock is cut at 4 x 5.25" and those layers are added to the same Not Quite Navy Card Base.


I also changed out the ribbon for a little more contrast -- adding Pear Pizzazz Poly Twill Ribbon and again, a tied faux bow.


To the stamped image layer, I added three Green Rhinestone Brads for a little sparkle and bling.


And finally, I pop-up the stamped focal layers with Stampin' Dimensionals which adds a little more interest and depth to the finished card. These changes were all fairly simple ... nothing drastic was done and you can clearly see that the same layout was used for both cards.


Now, when you want a card that has even more thought and time put into it, something that is even more special, then you can add a few more elements to really Take it to the Top. Realize, of course, that adding extra layers and embellishments may make this card more expensive to send in the mail. This may be a card that you want to hand-deliver, or include in a package or gift.


Adding to the additional layers of Card #2, I've now added a 1" strip of Pear Pizzazz cardstock at the bottom that has been punched with the Scallop Trim Border Punch. I've gone back to the Baja Breeze Seam Tape Ribbon, this time adding an actual bow, actually a double bow.


I've set the stamped focal image a bit lower and more to the left side on this final card, to allow room for the Daisy Die Cuts at the top. These were cut with the Big Shot and the Flower Daisies #2 Die, using Baja Breeze and Whisper White cardstock -- I cut two each of the small and medium sizes, sponged the edges with Not Quite Navy Ink and alternated them, gently curling the edges up using a Bone Folder. The center is adorned with an Antique Brad and the entire flower is popped-up with Stampin' Dimensionals. I've replaced the Rhinestone Brads with Self-Adhesive Basic Pearls at the bottom of the focal point.

So there you have it ... three cards all similar in design and materials but one simple and basic, one stepped up just a bit, and one that will really say "WOW"!


And now, it's YOUR turn! Let's see what you can do to dress-up your cards this week. Even if you don't want to Take it to the Top, what can you do to make your cards even more special? We challenge you to make a card this week and then add at least two additional elements to dress that card up a bit -- it could be layers or colors or texture or embellishments or additional images -- whatever you like.

Take some photos, post them on your blog or another Public Forum and tell us how you dressed your card up a bit and then come back to this post and leave us a link to your creation! We would love to see what you've done! You have until midnight next Wednesday night to leave your link and play along with the challenge.


Thanks so much, everyone, for sharing some time with me today on Takin' It To the Top. I hope you visit the Operators at Stamping 411 again soon!


Blessings, Gretchen

Thursday, March 3, 2011

Takin' It To the Top Thursdays with Bold Blossom

Hello everyone and welcome to a Brand New Feature at Stamping 411 -- Takin' It To the Top Thursday! Once each month, I will bring this popular feature from my blog to Stamping 411 where we begin with a basic card and show how to transform it into something SPECTACULAR by adding layers, texture, embellishments and simple techniques. I'll be issuing a challenge with each of the segments as well, for you to "step-up" your cards and projects. We'll include the Linky Tool each time so that you can show us how you are "Takin' It To the Top".


Okay, enough said! Today's Takin' It To The Top cards feature the adorable little stamp set called Bold Blossom. The colors for each card are Old Olive, Tangerine Tango, Melon Mambo and Whisper White with just a touch of Daffodil Delight. Here's the first card ... the basic card. Now, there's nothing "wrong" with this card -- it's adorable, but it is basic. It would be a great card for a beginning stamper or if you need to make quick multiples. As you can see, I've stamped the leaves and flowers on a 3" square of Whisper White cardstock, mounted that on a 3.25" square of Melon Mambo, attached that to a 4 x 5.25" piece of Tangerine Tango and stamped the sentiment in the bottom right-hand corner, attaching the entire thing to an Old Olive Card Base (5.5 x 8.5", scored and folded).


Now, we're going to take that same, basic card and step it up just a bit! The dimensions, stamping and colors are all the same.


I've added some embossing on the Tangerine Tango Layer (using the Elegant Bouquet Impressions Folder and the Big Shot). I've added some 5/8" Satin Ribbon with a Faux Bow tied on it. I've stamped the sentiment on a scrap of Whisper White and punched it out with the Large Oval Punch. And finally, I've added a little butterfly at the top, attached with Stampin' Dimensionals. These are all little things, simple things that you can do to step your card making up to the next level. If you don't want to do all four things, try just adding a couple of simple fixes to your basic card and see what you come up with.


Okay, are you ready to Take It To the Top! Here we go ... I had such fun creating this final card for my post today! It's bright and cheery and springy and full of whimsical elements and surprises. But as you can see, it's still begins with the same Basic Card that we started with. What's changed on this one?


To begin with, I created some fabulous flower embellishments using the Sweet Stitches Designer Big Buttons and some Pompom Trim. It's easy to do -- just apply Sticky Strip adhesive all around the back of the button (you kind of make "pleats" as you apply it in a circle). Peel off the red backing and stick the trim around the edge. I then stamped the flower image in Daffodil Delight, punched it out with the 3/4" Circle Punch and used a Stampin' Dimensional to apply it to the button.


Instead of putting 3 flowers on this final card, I just put two which allows more room for some additional butterflies -- one each in Tangerine Tango, Melon Mambo and Daffodil Delight.
Other small changes on this final card include adding a Scallop Oval Punchie under the sentiment and inking the edges of the Large Oval with a little Melon Mambo ink. And adding a real bow instead of a faux bow. And that it's. See what a difference just a few simple changes can make to take your cards from Basic to step-up and beyond!


And now, my friends, it's YOUR turn! Let's see what you can do to take your cards to the top this week! It's easy to play along! You don't have to create three cards like I did. Just create one, but when you post it, tell us how you Took it to the Top! Try to add at least two or more simple changes (techniques, layers, color, texture, embellishments, etc.) that you wouldn't have normally done. Take your basic card, and then Take it to the Top! The Stampin' 411 Operators can't wait to see what you do with this challenge! Just post a link to your Blog Post (or Public Forum Post) below! You have until midnight next Wednesday, March 9th, to play along!

Alright ... let's Take it to the Top!

Blessings, Gretchen